

MS-500 Practice Test Free – 50 Real Exam Questions to Boost Your Confidence
Preparing for the MS-500 exam? Start with our MS-500 Practice Test Free – a set of 50 high-quality, exam-style questions crafted to help you assess your knowledge and improve your chances of passing on the first try.
Taking a MS-500 practice test free is one of the smartest ways to:
- Get familiar with the real exam format and question types
- Evaluate your strengths and spot knowledge gaps
- Gain the confidence you need to succeed on exam day
Below, you will find 50 free MS-500 practice questions to help you prepare for the exam. These questions are designed to reflect the real exam structure and difficulty level. You can click on each Question to explore the details.
After you answer a question in this section, you will NOT be able to return to it. As a result, these questions will not appear in the review screen.
You have a Microsoft 365 E5 subscription that contains a user named User1.
You need to ensure that User1 can review Conditional Access policies.
Solution: You assign User1 the Security Reader role.
Does that meet the goal?
A. Yes
B. No
You have a Microsoft 365 E5 subscription that contains the users shown in the following table.You enable the authentication methods registration campaign and configure the Microsoft Authenticator method for Group1. Which users will be prompted to configure authentication during sign in?
A. User1 only
B. User2 only
C. User2 and User3 only
D. User1 and User2 only
E. User2 and User3 only
F. User1, User2, and User3 only
You have an Azure Active Directory (Azure AD) tenant named contoso.com that contains the users shown in the following table.You discover that several security alerts are visible from the Microsoft Defender for Identity portal. You need to identify which users in contoso.com can close the security alerts. Which users should you identify?
A. User4 only
B. User1 and User2 only
C. User3 and User4 only
D. User1 and User3 only
E. User1 only
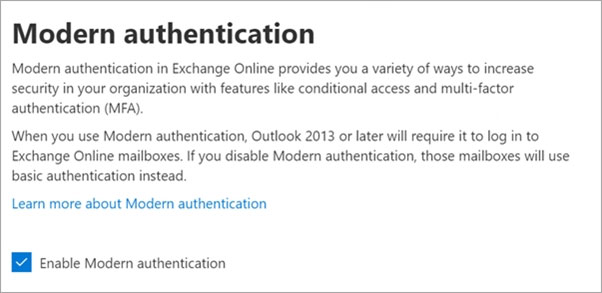
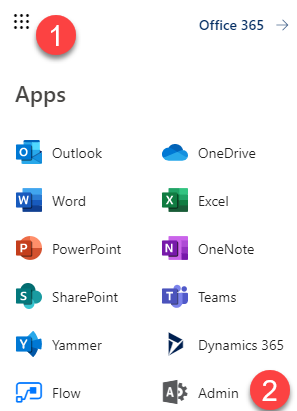
SIMULATION - Please wait while the virtual machine loads. Once loaded, you may proceed to the lab section. This may take a few minutes, and the wait time will not be deducted from your overall test time. When the Next button is available, click it to access the lab section. In this section, you will perform a set of tasks in a live environment. While most functionality will be available to you as it would be in a live environment, some functionality (e.g., copy and paste, ability to navigate to external websites) will not be possible by design. Scoring is based on the outcome of performing the tasks stated in the lab. In other words, it doesn't matter how you accomplish the task, if you successfully perform it, you will earn credit for that task. Labs are not timed separately, and this exam may more than one lab that you must complete. You can use as much time as you would like to complete each lab. But, you should manage your time appropriately to ensure that you are able to complete the lab(s) and all other sections of the exam in the time provided. Please note that once you submit your work by clicking the Next button within a lab, you will NOT be able to return to the lab. Username and password -Use the following login credentials as needed: To enter your username, place your cursor in the Sign in box and click on the username below. To enter your password, place your cursor in the Enter password box and click on the password below. Microsoft 365 Username: admin@LODSe244001.onmicrosoft.com Microsoft 365 Password: &=Q8v@2qGzYz If the Microsoft 365 portal does not load successfully in the browser, press CTRL-K to reload the portal in a new browser tab. The following information is for technical support purposes only: Lab instance: 11032396 - You need to ensure that a user named Alex Wilber can register for multifactor authentication (MFA). To complete this task, sign in to the Microsoft Office 365 admin center.
SIMULATION -
You need to implement a solution to manage when users select links in documents or email messages from Microsoft Office 365 ProPlus applications or Android devices. The solution must meet the following requirements:
✑ Block access to a domain named fabrikam.com
✑ Store information when the users select links to fabrikam.com
To complete this task, sign in to the Microsoft 365 portal.
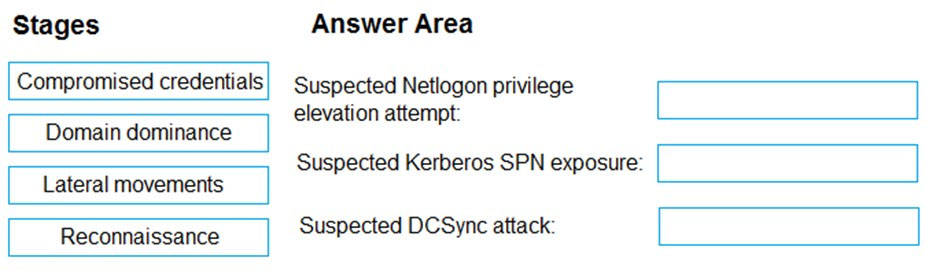
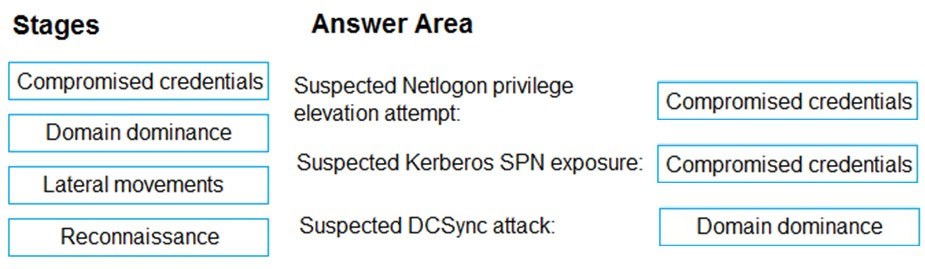
DRAG DROP -
You have a Microsoft 365 E5 subscription that uses Microsoft Defender for Identity.
You receive the following alerts:
✑ Suspected Netlogon privilege elevation attempt
✑ Suspected Kerberos SPN exposure
✑ Suspected DCSync attack
To which stage of the cyber-attack kill chain does each alert map? To answer, drag the appropriate alerts to the correct stages. Each alert may be used once, more than once, or not at all. You may need to drag the split bar between panes or scroll to view content.
NOTE: Each correct selection is worth one point.
Select and Place:
Your network contains an on-premises Active Directory domain. The domain contains a domain controller named DC1.
You have a Microsoft 365 E5 subscription.
You install the Microsoft Defender for Identity sensor on DC1.
You need to configure enhanced threat detection in Defender for Identity. The solution must ensure that the following events are collected from DC1:
✑ 4726 - User Account Deleted
✑ 4728 - Member Added to Global Security Group
✑ 4776 - Domain Controller Attempted to Validate Credentials for an Account (NTLM)
What should you do on DC1?
A. Install the Azure Monitor agent.
B. Install System Monitor (SYSMON).
C. Configure the Windows Event Collector service.
D. Configure the Advanced Audit Policy Configuration policy.
You have an Azure Active Directory (Azure AD) tenant named contoso.com and a Microsoft 365 subscription. Contoso.com contains the groups shown in the following table.You plan to create a supervision policy named Policy1. You need to identify which groups can be supervised by using Policy1. Which groups should you identify?
A. Group1 and Group4 only
B. Group1 only
C. Group1, Group3, and Group4 only
D. Group2 and Group3 only
E. Group1, Group2, and Group3 only
You have a Microsoft 365 E5 subscription.
You need to use Attack simulation training to launch a credential harvest simulation.
For which Microsoft 365 workloads can you create a payload?
A. Microsoft Exchange Online only
B. Microsoft Teams, Exchange Online, SharePoint Online, and OneDrive
C. Microsoft Teams and Exchange Online only
D. Microsoft SharePoint Online and OneDrive only
You have a Microsoft 365 subscription that contains the users shown in the following table.You enable self-service password reset for Group1 and configure security questions as the only authentication method for self-service password reset. You need to identity which user must answer security questions to reset their password. Which user should you identify?
A. User1
B. User2
C. User3
D. User4
You have a Microsoft 365 E5 subscription and a hybrid Microsoft Exchange Server organization.
Each member of a group named Executive has an on-premises mailbox. Only the Executive group members have multi-factor authentication (MFA) enabled. Each member of a group named Research has a mailbox in Exchange Online.
You need to use Microsoft 365 Attack simulation training to model a spear-phishing attack that targets the Research group members. The email addresses that you intend to spoof belong to the Executive group members.
What should you do first?
A. From the Microsoft Azure portal, configure the user risk policy settings in Azure AD Identity Protection.
B. Migrate the Executive group members to Exchange Online.
C. Enable MFA for the Research group members.
D. Enable MFA for your account.
E. From the Microsoft Defender for Identity portal, configure the primary workspace settings.
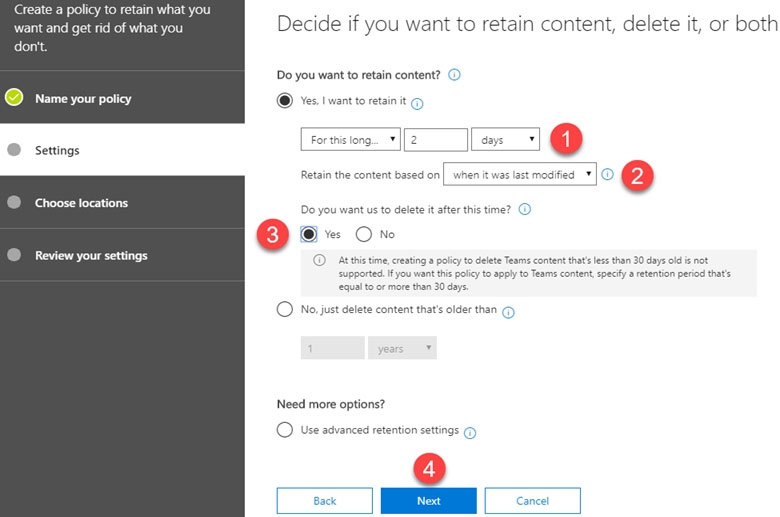
You have a Microsoft 365 E5 subscription that contains the resources shown in the following table.You have a retention label configured as shown in the following exhibit.
You apply the label to the resources. Which items can you delete?
A. Mail1 only
B. File1.docx and File2.xlsx only
C. Mail1 and File1.docx only
D. Mail1 and File2.xlsx only
E. Mail1, File1.docx, and File2.xlsx
You need to recommend a solution to protect the sign-ins of Admin1 and Admin2.
What should you include in the recommendation?
A. a device compliance policy
B. an access review
C. a user risk policy
D. a sign-in risk policy
You need to meet the technical requirements for User9. What should you do?
A. Assign the Privileged administrator role to User9 and configure a mobile phone number for User9
B. Assign the Compliance administrator role to User9 and configure a mobile phone number for User9
C. Assign the Security administrator role to User9
D. Assign the Global administrator role to User9
You have a Microsoft 365 E3 subscription.
You plan to audit all Microsoft Exchange Online user and admin activities.
You need to ensure that all the Exchange audit log records are retained for one year.
What should you do?
A. Modify the retention period of the default audit retention policy.
B. Create a custom audit retention policy.
C. Assign Microsoft 365 Enterprise E5 licenses to all users.
D. Modify the record type of the default audit retention policy.
You have a Microsoft 365 subscription and a Microsoft Defender Advanced Threat Protection (Microsoft Defender ATP) subscription. You have devices enrolled in Microsoft Endpoint Manager as shown in the following table:You integrate Microsoft Defender ATP and Endpoint Manager. You plan to evaluate the Microsoft Defender ATP risk level for the devices. You need to identify which devices can be evaluated. Which devices should you identify?
A. Device1 and Device2 only
B. Device1 only
C. Device1 and Device3 only
D. Device1, Device2 and Device3
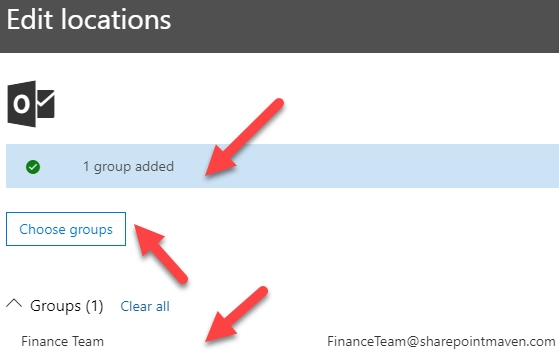
SIMULATION - Please wait while the virtual machine loads. Once loaded, you may proceed to the lab section. This may take a few minutes, and the wait time will not be deducted from your overall test time. When the Next button is available, click it to access the lab section. In this section, you will perform a set of tasks in a live environment. While most functionality will be available to you as it would be in a live environment, some functionality (e.g., copy and paste, ability to navigate to external websites) will not be possible by design. Scoring is based on the outcome of performing the tasks stated in the lab. In other words, it doesn't matter how you accomplish the task, if you successfully perform it, you will earn credit for that task. Labs are not timed separately, and this exam may more than one lab that you must complete. You can use as much time as you would like to complete each lab. But, you should manage your time appropriately to ensure that you are able to complete the lab(s) and all other sections of the exam in the time provided. Please note that once you submit your work by clicking the Next button within a lab, you will NOT be able to return to the lab. Username and password -Use the following login credentials as needed: To enter your username, place your cursor in the Sign in box and click on the username below. To enter your password, place your cursor in the Enter password box and click on the password below. Microsoft 365 Username: admin@LODSe244001.onmicrosoft.com Microsoft 365 Password: &=Q8v@2qGzYz If the Microsoft 365 portal does not load successfully in the browser, press CTRL-K to reload the portal in a new browser tab. The following information is for technical support purposes only: Lab instance: 11032396 - You need to ensure that email messages in Exchange Online and documents in SharePoint Online are retained for eight years. To complete this task, sign in to the Microsoft Office 365 admin center.


HOTSPOT - You have a Microsoft 365 E5 subscription that contains the users shown in the following table.You plan to enable Microsoft Defender for Endpoint role-based access control (RBAC). You need to identify which users can enable RBAC in Microsoft Defender for Endpoint, and which users will lose access to Microsoft 365 Defender portal after RBAC in enabled. Which users should you identify? To answer, select the appropriate options in the answer area. NOTE: Each correct selection is worth one point.


After you answer a question in this section, you will NOT be able to return to it. As a result, these questions will not appear in the review screen.
You have an on-premises Active Directory domain named contoso.com.
You install and run Azure AD Connect on a server named Server1 that runs Windows Server.
You need to view Azure AD Connect events.
Solution: You use the Security event log on Server1.
Does that meet the goal?
A. Yes
B. No
SIMULATION -
You need to create a policy that identifies content in Microsoft OneDrive that contains credit card numbers.
To complete this task, sign in to the Microsoft 365 portal.
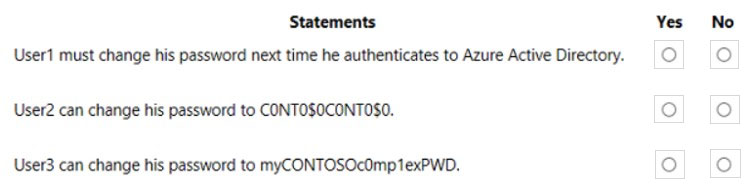
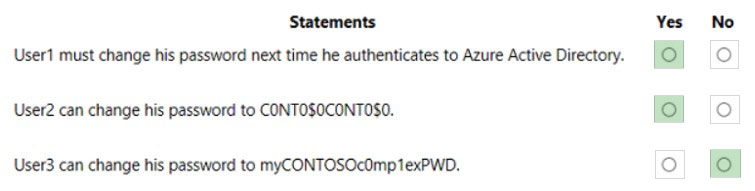
HOTSPOT - Your company has a Microsoft 365 E5 subscription and a hybrid Azure Active Directory named contoso.com. Contoso.com includes the following users:You configure Password protection for Contoso.com as shown in the following exhibit.
For each of the following statements, select Yes if the statement is true. Otherwise, select No. NOTE: Each correct selection is worth one point. Hot Area:
SIMULATION -
You need to ensure that a global administrator is notified when a document that contains U.S. Health Insurance Portability and Accountability Act (HIPAA) data is identified in your Microsoft 365 tenant.
To complete this task, sign in to the Microsoft Office 365 admin center.
After you answer a question in this section, you will NOT be able to return to it. As a result, these questions will not appear in the review screen. You have a Microsoft 365 subscription that contains the users shown in the following table.You discover that all the users in the subscription can access Compliance Manager reports. The Compliance Manager Reader role is not assigned to any users. You need to recommend a solution to prevent a user named User5 from accessing the Compliance Manager reports. Solution: You recommend assigning the Compliance Manager Reader role to User1. Does this meet the goal?
A. Yes
B. No
HOTSPOT -
How should you configure Group3? To answer, select the appropriate options in the answer area.
NOTE: Each correct selection is worth one point.
Hot Area:


You have a Microsoft 365 E5 subscription that contains the groups shown in the following table.You plan to implement privileged access in Microsoft 365. Which groups can you specify as the default approval group?
A. Group1, Group2, or Group3 only
B. Group4 only
C. Group1, Group2, Group3, or Group4
D. Group1, Group3, or Group4 only
E. Group3 or Group4 only
You need to resolve the issue that generates the automated email messages to the IT team.
Which tool should you run first?
A. Synchronization Service Manager
B. Azure AD Connect wizard
C. Synchronization Rules Editor
D. IdFix
You plan to deploy a new Microsoft 365 subscription that will contain 500 users.
You need to ensure that the following actions are performed when the users sign in to the subscription:
•	Evaluate the users’ risk level based on their location and travel.
•	Require high-risk users to sign in by using Azure Multi-Factor Authentication (Azure MFA).
The solution must minimize cost.
Which license should you assign to each user?
A. Enterprise Mobility + Security E3
B. Microsoft 365 Business Premium
C. Microsoft 365 E3
D. Microsoft 365 E5
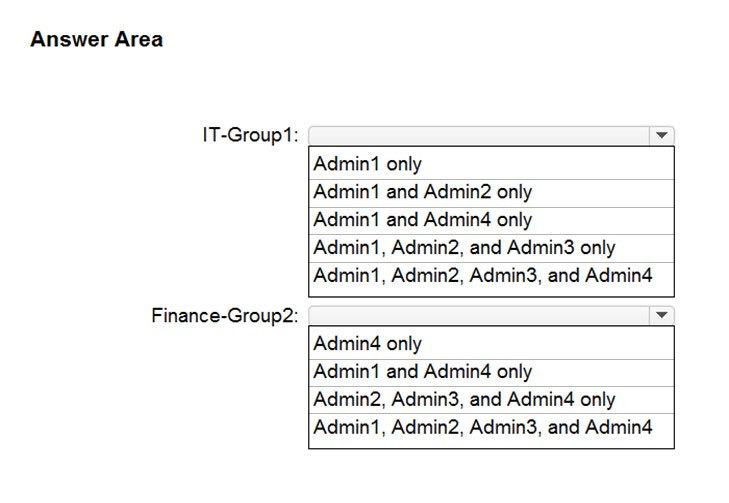
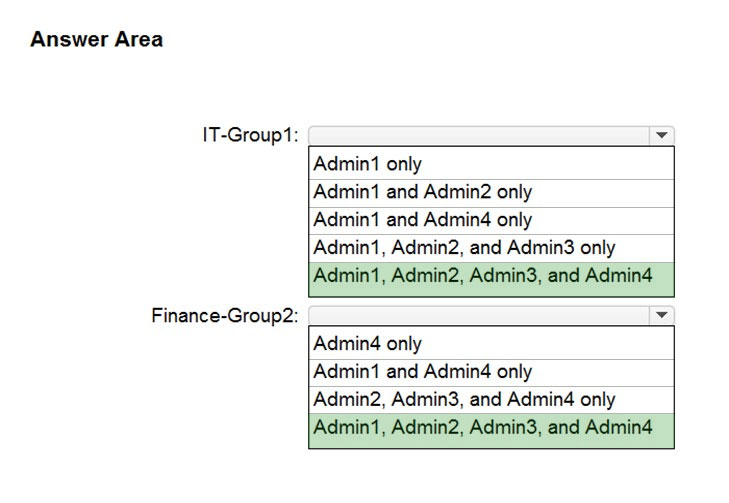
HOTSPOT - You have a Microsoft 365 E5 subscription that contains the users shown in the following table.For contoso.com, you create a group naming policy that has the following configuration. - You plan to create the groups shown in the following table.
Which users can be used to create each group? To answer, select the appropriate options in the answer area. NOTE: Each correct selection is worth one point. Hot Area:
After you answer a question in this section, you will NOT be able to return to it. As a result, these questions will not appear in the review screen.
You have a Microsoft 365 E5 subscription that contains a user named User1.
You need to ensure that User1 can review Conditional Access policies.
Solution: You assign User1 the Authentication Administrator role.
Does that meet the goal?
A. Yes
B. No
After you answer a question in this section, you will NOT be able to return to it. As a result, these questions will not appear in the review screen.
You have a Microsoft 365 E5 subscription that is associated to a Microsoft Azure Active Directory (Azure AD) tenant named contoso.com.
You use Active Directory Federation Services (AD FS) to federate on-premises Active Directory and the tenant. Azure AD Connect has the following settings:
✑ Source Anchor: objectGUID
✑ Password Hash Synchronization: Disabled
✑ Password writeback: Disabled
✑ Directory extension attribute sync: Disabled
✑ Azure AD app and attribute filtering: Disabled
✑ Exchange hybrid deployment: Disabled
✑ User writeback: Disabled
You need to ensure that you can use leaked credentials detection in Azure AD Identity Protection.
Solution: You modify the Source Anchor settings.
Does that meet the goal?
A. Yes
B. No
After you answer a question in this section, you will NOT be able to return to it. As a result, these questions will not appear in the review screen.
You have an on-premises Active Directory domain named contoso.com.
You install and run Azure AD Connect on a server named Server1 that runs Windows Server.
You need to view Azure AD Connect events.
Solution: You use the System event log on Server1.
Does that meet the goal?
A. Yes
B. No
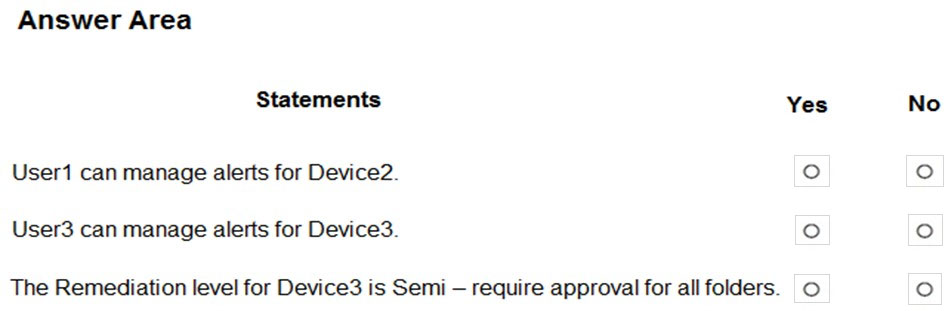
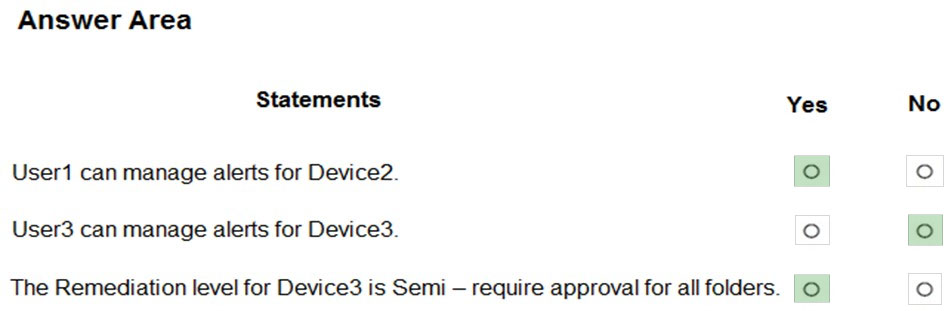
HOTSPOT - You have a Microsoft 365 E5 subscription that contains the uses shown in the following table.You have the devices shown in the following table.
You have the Microsoft Defender for Endpoint portal roles shown in the following table.
You have the Microsoft Defender for Endpoint device groups shown in the following table.
For each of the following statements, select Yes if the statement is true. Otherwise, select No. NOTE: Each correct selection is worth one point. Hot Area:
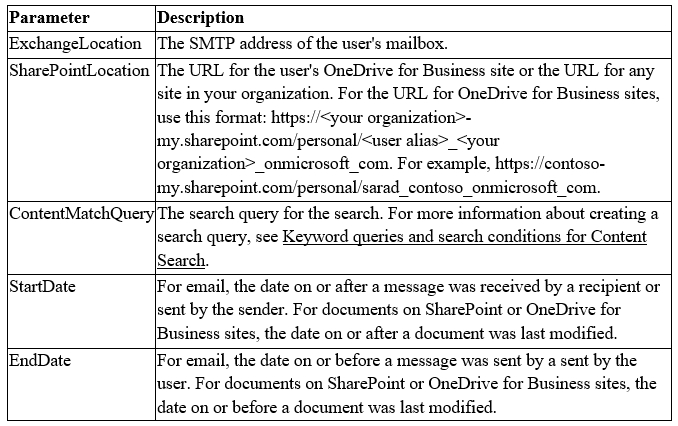
SIMULATION -
You plan to create a script to automate user mailbox searches. The script will search the mailbox of a user named Allan Deyoung for messages that contain the word injunction.
You need to create the search that will be included in the script.
To complete this task, sign in to the Microsoft 365 admin center.
You have a Microsoft 365 subscription.
You need to recommend a passwordless authentication solution that uses biometric authentication.
What should you include in the recommendation?
A. Windows Hello for Business
B. a smart card
C. the Microsoft Authenticator app
D. a PIN
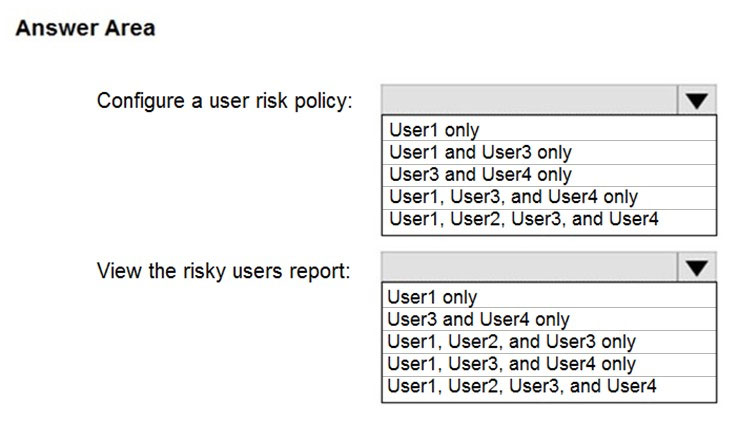
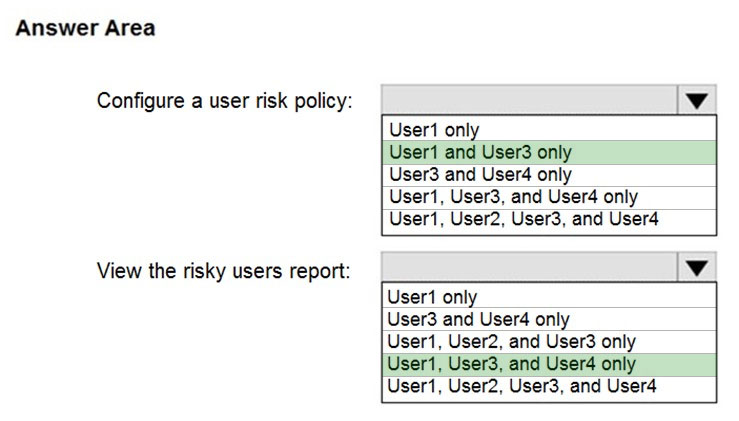
HOTSPOT - You have a Microsoft 365 E5 subscription that contains the users shown in the following table.You plan to implement Azure Active Directory (Azure AD) Identity Protection. You need to identify which users can perform the following actions: ✑ Configure a user risk policy. ✑ View the risky users report. Which users should you identify? To answer, select the appropriate options in the answer area. NOTE: Each correct selection is worth one point. Hot Area:
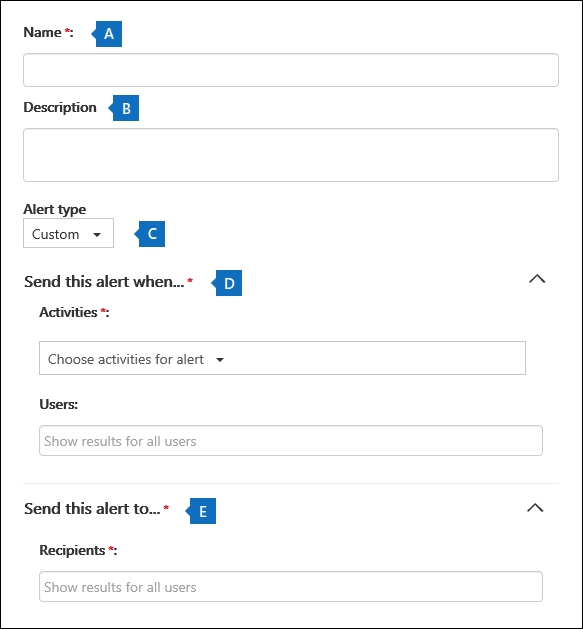
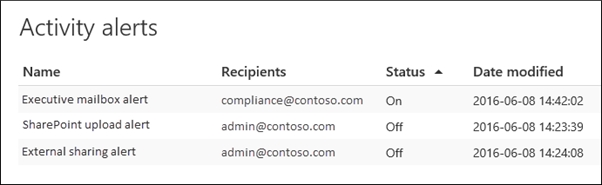
SIMULATION - Please wait while the virtual machine loads. Once loaded, you may proceed to the lab section. This may take a few minutes, and the wait time will not be deducted from your overall test time. When the Next button is available, click it to access the lab section. In this section, you will perform a set of tasks in a live environment. While most functionality will be available to you as it would be in a live environment, some functionality (e.g., copy and paste, ability to navigate to external websites) will not be possible by design. Scoring is based on the outcome of performing the tasks stated in the lab. In other words, it doesn't matter how you accomplish the task, if you successfully perform it, you will earn credit for that task. Labs are not timed separately, and this exam may more than one lab that you must complete. You can use as much time as you would like to complete each lab. But, you should manage your time appropriately to ensure that you are able to complete the lab(s) and all other sections of the exam in the time provided. Please note that once you submit your work by clicking the Next button within a lab, you will NOT be able to return to the lab. Username and password -Use the following login credentials as needed: To enter your username, place your cursor in the Sign in box and click on the username below. To enter your password, place your cursor in the Enter password box and click on the password below. Microsoft 365 Username: admin@LODSe244001.onmicrosoft.com Microsoft 365 Password: &=Q8v@2qGzYz If the Microsoft 365 portal does not load successfully in the browser, press CTRL-K to reload the portal in a new browser tab. The following information is for technical support purposes only: Lab instance: 11032396 - You need to ensure that SharepointAdmins@contoso.com receives an alert when a user establishes a sync relationship to a document library from a computer that is a member of an Active Directory (AD) domain. To complete this task, sign in to the Microsoft Office 365 admin center.
SIMULATION -
You need to create an Azure Information Protection label to meet the following requirements:
✑ Content must expire after 21 days.
✑ Offline access must be allowed for 21 days only.
✑ Documents must be protected by using a cloud key.
✑ Authenticated users must be able to view content only.
To complete this task, sign in to the Microsoft 365 admin center.

You have a Microsoft 365 E5 subscription.
A security manager receives an email message every time a data loss prevention (DLP) policy match occurs.
You need to limit alert notifications to actionable DLP events.
What should you do?
A. From the Microsoft 365 Compliance center, modify the Policy Tips settings of a DLP policy.
B. From the Cloud App Security portal, apply a filter to the alerts.
C. From the Microsoft 365 Compliance center, modify the User overrides settings of a DLP policy.
D. From the Microsoft 365 Compliance center, modify the matched activities threshold of an alert policy.
You have a Microsoft 365 E5 subscription and a hybrid Microsoft Exchange Server organization.
Each member of a group named Executive has an on-premises mailbox. Only the Executive group members have multi-factor authentication (MFA) enabled. Each member of a group named Research has a mailbox in Exchange Online.
You need to use Microsoft Office 365 Attack simulator to model a spear-phishing attack that targets the Research group members.
What should you do first?
A. From the Microsoft Defender for Identity portal, configure the primary workspace settings.
B. From the Microsoft Azure portal, configure the user risk policy settings in Azure AD Identity Protection.
C. Enable MFA for the Research group members.
D. Migrate the Executive group members to Exchange Online.
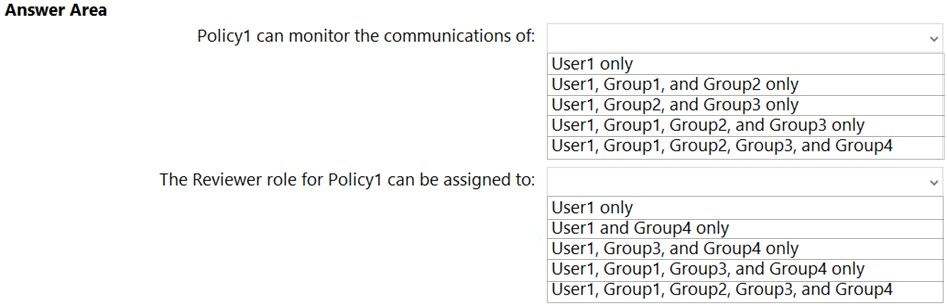
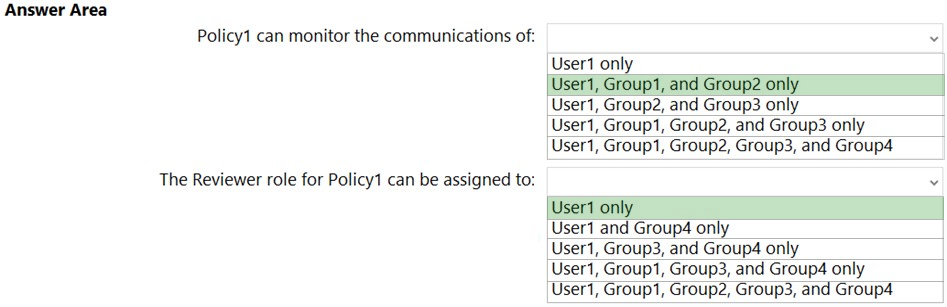
HOTSPOT - You have a Microsoft 365 E5 subscription that contains a user named User1 and the groups shown in the following table.You plan to create a communication compliance policy named Policy1. You need to identify whose communications can be monitored by Policy1, and who can be assigned the Reviewer role for Policy1. Who should you identify? To answer, select the appropriate options in the answer area. NOTE: Each correct selection is worth one point. Hot Area:
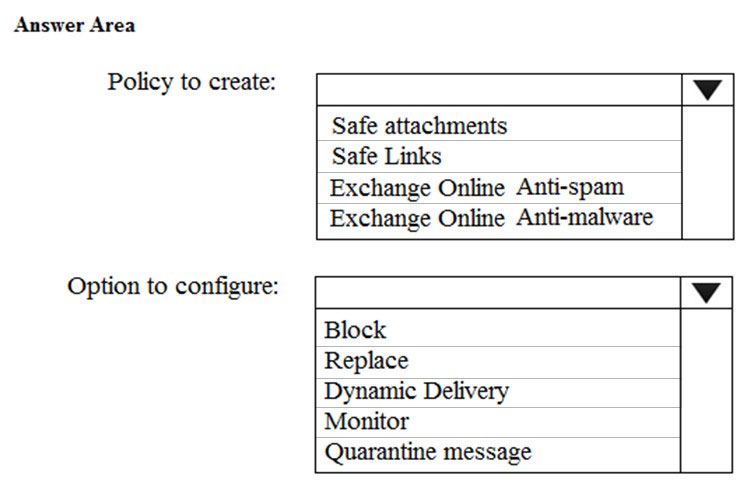
HOTSPOT -
You need to recommend an email antimalware solution that meets the security requirements.
What should you include in the recommendation? To answer, select the appropriate options in the answer area.
NOTE: Each correct selection is worth one point.
Hot Area:

You have an Azure Sentinel workspace.
You need to manage incidents based on alerts generated by Microsoft Cloud App Security.
What should you do first?
A. From the Cloud App Security portal, configure security extensions.
B. From the Cloud App Security portal, configure app connectors.
C. From the Cloud App Security portal, configure log collectors.
D. From the Microsoft 365 compliance center, add and configure a data connector.
HOTSPOT - You have a Microsoft 365 E5 subscription. Users and device objects are added and removed daily. Users in the sales department frequently change their device. You need to create three following groups:The solution must minimize administrative effort. What is the minimum number of groups you should create for each type of membership? To answer, select the appropriate options in the answer area. NOTE: Each correct selection is worth one point. Hot Area:


You need to recommend a solution that meets the technical and security requirements for sharing data with the partners.
What should you include in the recommendation? Each correct answer presents part of the solution.
NOTE: Each correct selection is worth one point.
A. Create an access review
B. Assign the Global administrator role to User1
C. Assign the Guest inviter role to User1
D. Modify the External collaboration settings in the Azure Active Directory admin center
You configure several Microsoft Defender for Office 365 policies in a Microsoft 365 subscription.
You need to allow a user named User1 to view Defender for Office 365 reports from the Threat management dashboard.
Which role provides User1 with the required role permissions?
A. Reports reader
B. Exchange administrator
C. Security administrators
D. Compliance administrator
You have a Microsoft 365 subscription.
You need to ensure that users can manually designate which content will be subject to data loss prevention (DLP) policies.
What should you create first?
A. a retention label
B. a custom sensitive information type
C. a Data Subject Request (DSR)
D. a safe attachments policy
You have a Microsoft 365 subscription that contains a user named User1.
You need to assign User1 permissions to search Microsoft Office 365 audit logs.
What should you use?
A. the Azure Active Directory admin center
B. the Exchange admin center
C. the Microsoft 365 Defender portal
D. the Microsoft 365 Compliance center
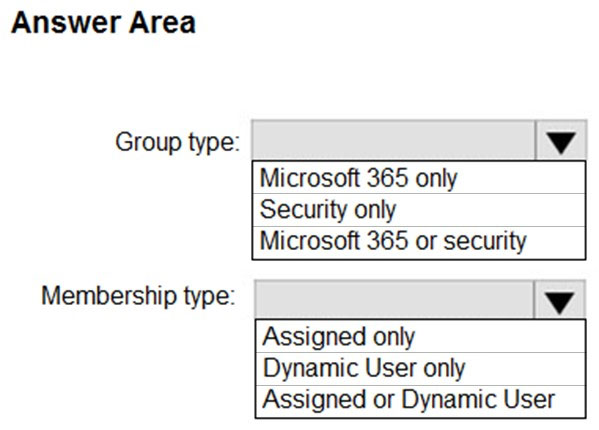
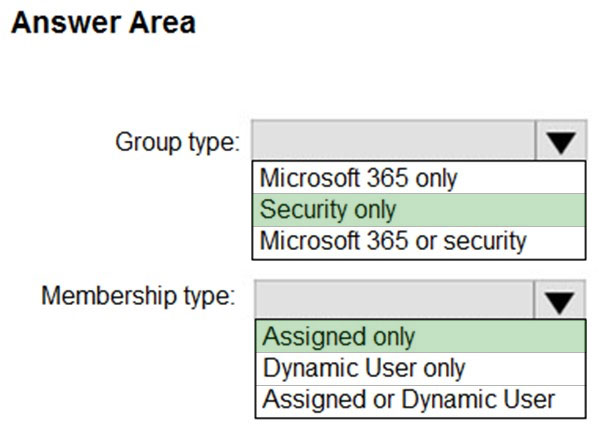
HOTSPOT -
You have a Microsoft 365 E5 subscription.
You need to create a role-assignable group. The solution must ensure that you can nest the group.
How should you configure the group? To answer, select the appropriate options in the answer area.
NOTE: Each correct selection is worth one point.
Hot Area:
SIMULATION -
You discover that Microsoft SharePoint content is shared with users from multiple domains.
You need to allow sharing invitations to be sent only to users in an email domain named contoso.com.
To complete this task, sign in to the Microsoft 365 portal.
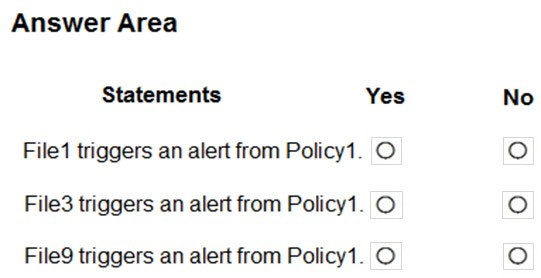
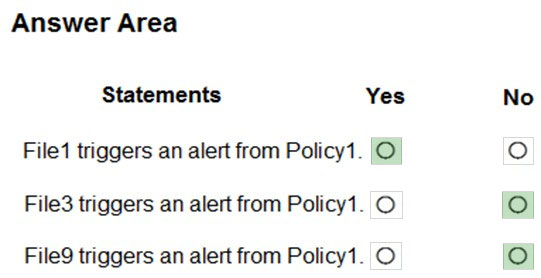
HOTSPOT - You have a Microsoft 365 subscription that contains a Microsoft SharePoint Online site named Site1. Site1 contains the folders shown in the following table.At 09:00, you create a Microsoft Cloud App Security policy named Policy1 as shown in the following exhibit.
After you create Policy1, you upload files to Site1 as shown in the following table.
For each of the following statements, select Yes if the statement is true. Otherwise, select No. NOTE: Each correct selection is worth one point. Hot Area:
Free Access Full MS-500 Practice Test Free Questions
If you’re looking for more MS-500 practice test free questions, click here to access the full MS-500 practice test.
We regularly update this page with new practice questions, so be sure to check back frequently.
Good luck with your MS-500 certification journey!