Terminal Lines and Password Protection
how to configure and verify local network device access control through local usernames and passwords for authentication and how to configure and verify role-based access control (RBAC) through privilege levels.
Password protection to control or restrict access to the CLI to protect the router from unauthorized remote access and unauthorized local access is the most common type of security that needs to be implemented.
Terminal Lines
There are three basic methods to gain access to the CLI of an IOS device:
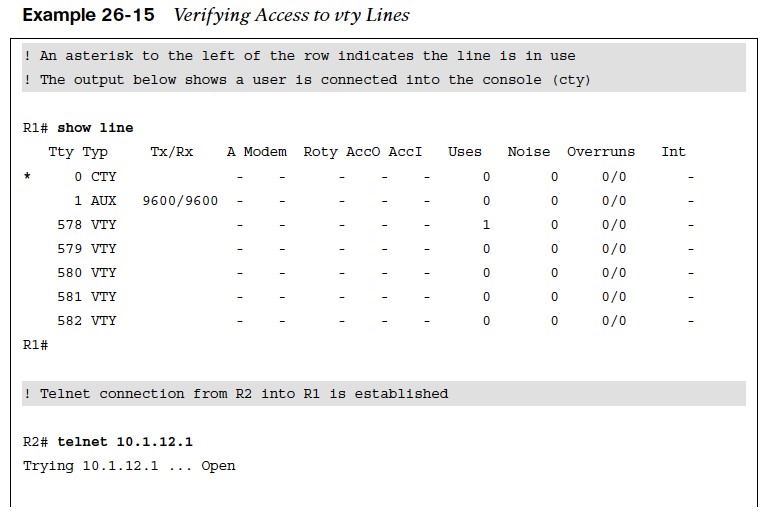
- Console port (cty) line – On any IOS device, this appears in configuration as line con 0 and in the output of the command show line as cty. The console port is mainly used for local system access using a console terminal.
- Auxiliary port (aux) line – This appears in the configuration as line aux 0. The aux port is mainly used for remote access into the device through a modem.
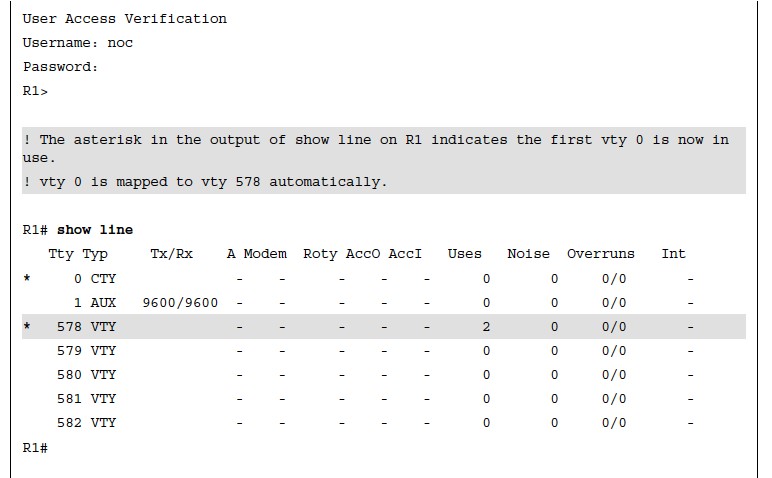
- Virtual terminal (vty) lines – These lines are displayed by default in the configuration as line vty 0 4. They are used solely for remote Telnet and SSH connections. They are virtual because they are logical lines with no physical interface associated to them.
Password Protection
Each of these types of terminal lines should be password protected. There are three ways to add password protection to the lines:
- Using a password configured directly on the line (not recommended)
- Using username-based authentication (recommended as a fallback)
- Using an AAA server: Highly recommended and covered later in this chapter, in the section “Authentication, Authorization, and Accounting (AAA)”
Password Types
There are five available password types in Cisco IOS:
- Type 0 passwords – These passwords are the most insecure because they are not encrypted and are visible in the device configuration in plaintext. The command enable password is an example of a command that uses a type 0 password.
- Type 5 passwords – These passwords use an improved Cisco proprietary encryption algorithm that makes use of the MD5 hashing algorithm. The command enable secret specifies an additional layer of security over the command enable password.
- Type 7 passwords – These passwords use a Cisco proprietary Vigenere cypher encryption algorithm and are known to be weak. Type 7 encryption is enabled by the command service password-encryption.
- Type 8 passwords – Type 8 passwords specify a Password-Based Key Derivation Function 2 (PBKDF2) with a SHA-256 hashed secret and are considered to be uncrackable.
- Type 9 passwords – These use the SCRYPT hashing algorithm. Just like type 8 passwords, they are considered to be uncrackable.
Password Encryption
- service password-encryption command in global configuration mode is used to encrypt type 0 passwords in the configuration (for example, BGP passwords) or over a plaintext session such as Telnet in an effort to prevent unauthorized users from viewing the password.
- Passwords configured prior to configuring the command service passwordencryption are not encrypted and must be reentered into the configuration. Password encryption is applied to all type 0 passwords, including authentication key passwords; cty, aux, and vty line passwords; and BGP neighbor passwords.
- Unfortunately, the command service password-encryption encrypts passwords with type 7 encryption, which is easily reversible.
Username and Password Authentication
Username accounts can be used for several applications, such as console, aux, and vty lines. To establish a username and password login authentication system, you can create usernames on a device for all device users or groups. There are three different ways to configure a username on IOS:
- Using the command username {username} password {password} configures a plaintext password (type 0).
- Using the command username {username} secret {password} provides type 5 encryption.
- Using the command username {username} algorithm-type {md5 | sha256 | scrypt} secret {password} provides type 5, type 8, or type 9 encryption, respectively.
The third command is recommended because it allows for the highest level of password encryption (type 8 and type 9).
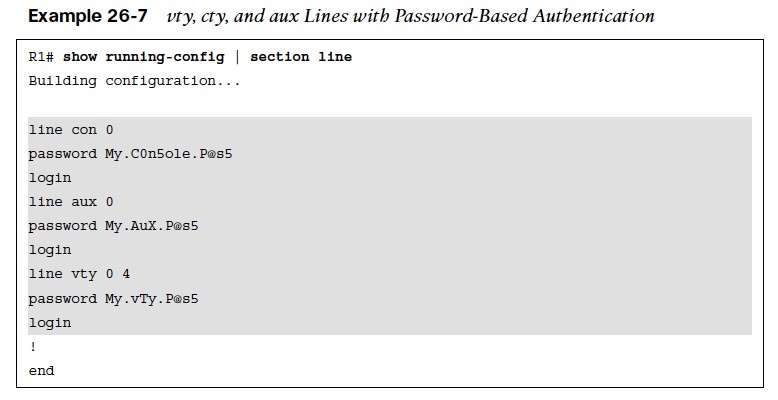
Configuring Line Local Password Authentication
- To enable password authentication on a line, the following two commands are required under line configuration mode:
- password password to configure the password
- login to enable password checking at login
Verifying Line Local Password Authentication

- All that is required to test the password is to log off the console and log back in again using the configured console password.
Configuring Line Local Username & Password Authentication
To enable username and password authentication, the following two commands are required:
- The command username in global configuration mode (using one of the options shown in the “Username and Password Authentication” section, earlier in this chapter).
- The command login local under line configuration mode to enable username-based authentication at login.
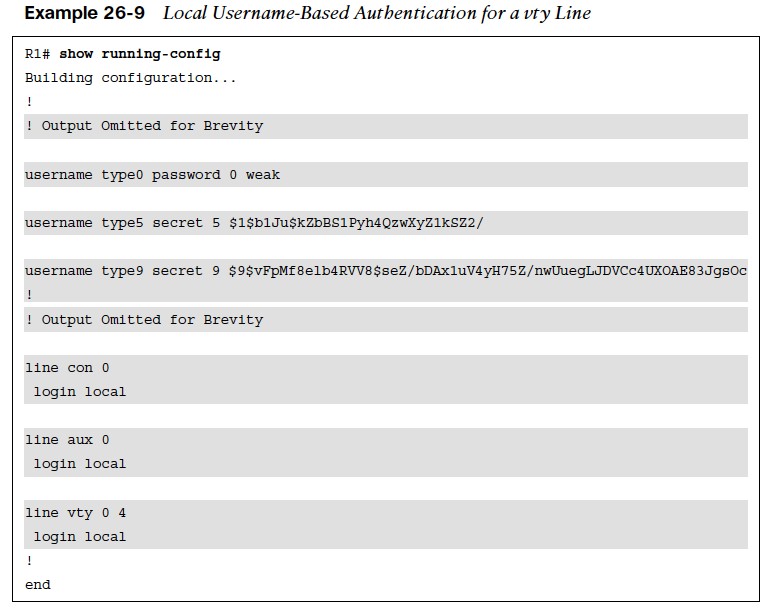
- Example 26-9 shows three usernames (type0, type5, and type9) with different password encryptions each that are allowed to log in to the device
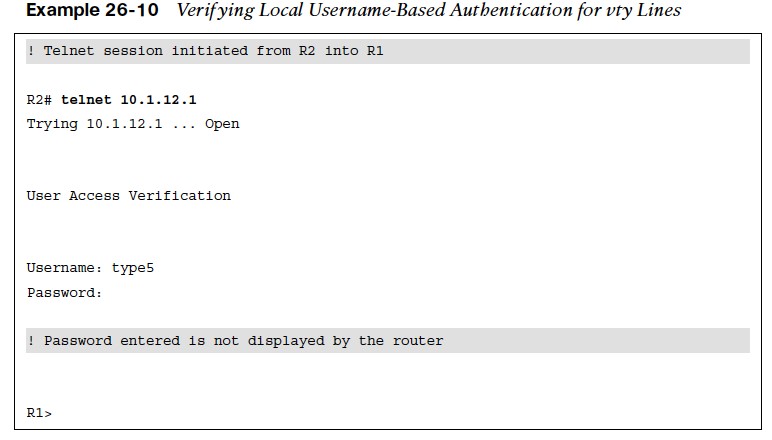
Verifying Line Local Username & Password Authentication
- Example 26-10 shows user type5 establishing a Telnet session from R2 into R1 using username-based authentication.
Privilege Levels & Role-Based Access Control (RBAC)
The Cisco IOS CLI by default includes three privilege levels, each of which defines what commands are available to a user:
- Privilege level 0 – Includes the disable, enable, exit, help, and logout commands.
- Privilege level 1: –Also known as User EXEC mode. The command prompt in this mode includes a greater-than sign (R1>). From this mode it is not possible to make configuration changes; in other words, the command configure terminal is not available.
- Privilege level 15 – Also known as Privileged EXEC mode. This is the highest privilege level, where all CLI commands are available. The command prompt in this mode includes a hash sign (R1#).
The global configuration command privilege {mode} level {level} {command string} is used to change or set a privilege level for a command to any of these levels.
Configuring a Username with Privilege Level

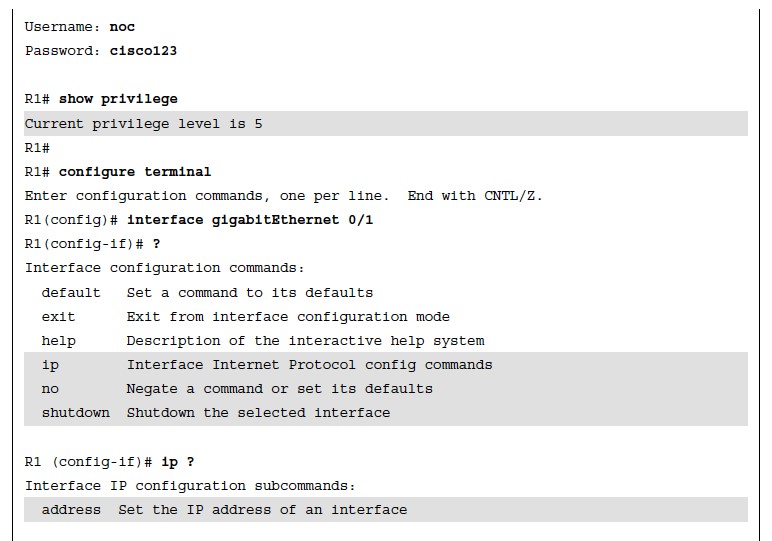
- Example 26-11 shows a configuration where the user noc is created along with the type 9 (scrypt) secret password cisco123.
- Notice that the privilege level is also configured to level 5 as part of the username command.
- Level 5 allows the user to go into any interface on the router and shut it down, unshut it, and configure an IP address on it.
Verifying Privilege Levels
The example shows a quick test to verify that the only commands allowed for privilege level 5 users are those specified by the privilege level command. 

Controlling Access to vty Lines with ACLs
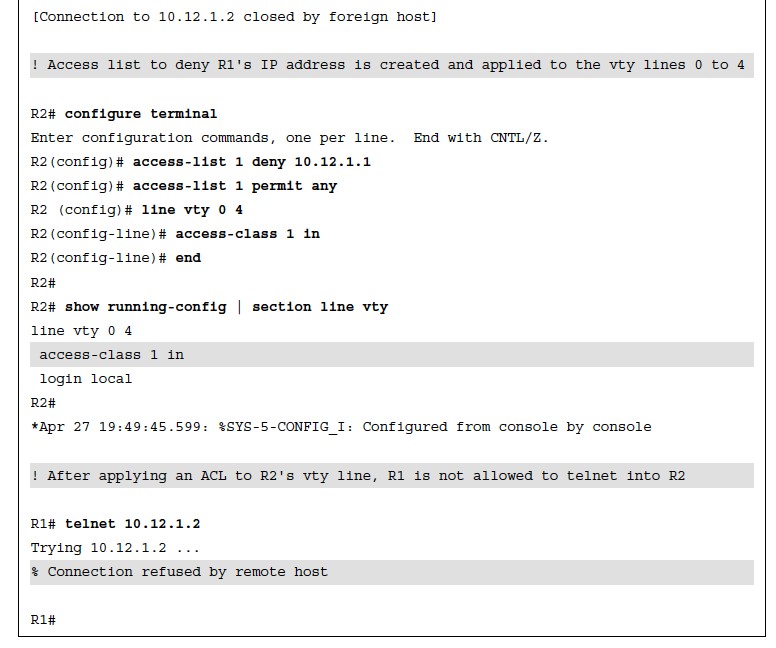
- Access to the vty lines of an IOS device can be further secured by applying inbound ACLs on them, allowing access only from a restricted set of IP addresses. Outbound vty connections from an IOS device can also be controlled by applying outbound ACLs to vtys.
- To apply a standard or an extended access list to a vty line, use the command access-class {access-list-number|access-list-name} {in|out} under line configuration mode. The in keyword applies an inbound ACL, and the out keyword applies an outbound ACL.
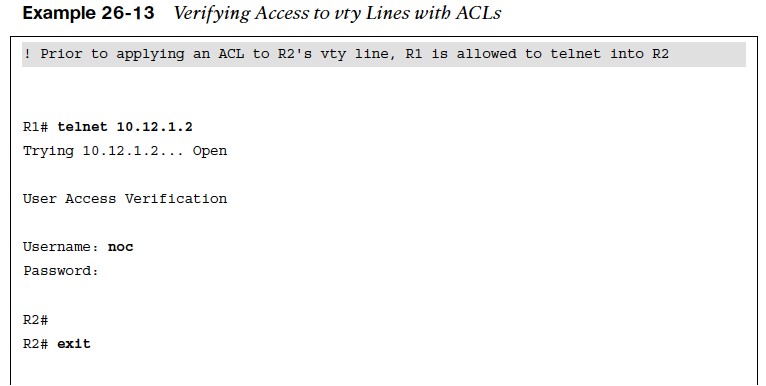
Verifying Access to vty Lines with ACLs
- Example 26-13 demonstrates R1 using Telnet to get into R2 before and after applying an
- ACL to R2’s vty line. R1 is configured with IP address 10.12.1.1 and R2 with 10.12.1.2. The ACL being applied to R2’s vty line is meant to block vty access into it from R1.
Controlling Access to vty Lines Using Transport Input
| Keyword | Description |
| All | Allows Telnet and SSH |
| None | Blocks Telnet and SSH |
| telnet | Allows Telnet only |
| ssh | Allows SSH only |
| telnet ssh | Allows Telnet and SSH |
- Table 26-3 Transport Input Command Keyword Description
- Another way to further control what type of protocols are allowed to access the vty lines is to use the command transport input {all | none | telnet | ssh} under line configuration mode.
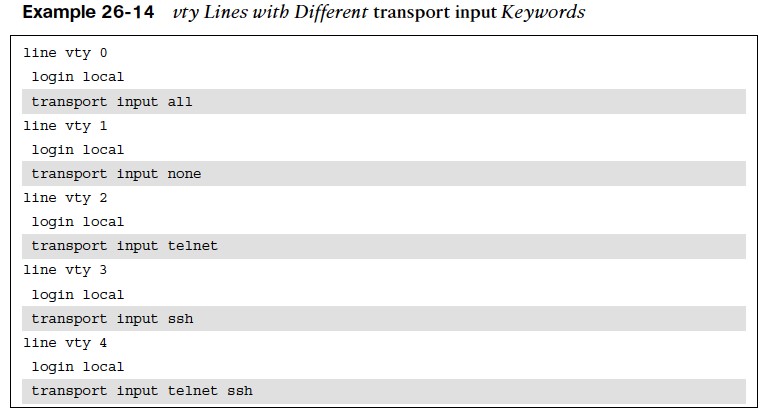
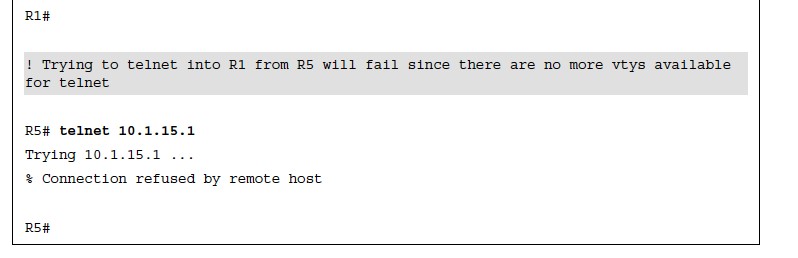
- Example 26-14 shows the vty lines from 0 to 4 configured with different transport input command keywords.
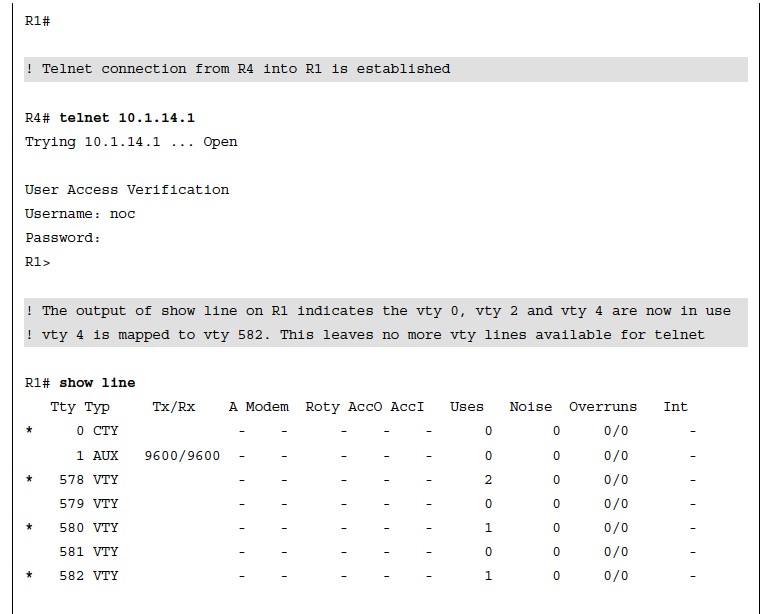
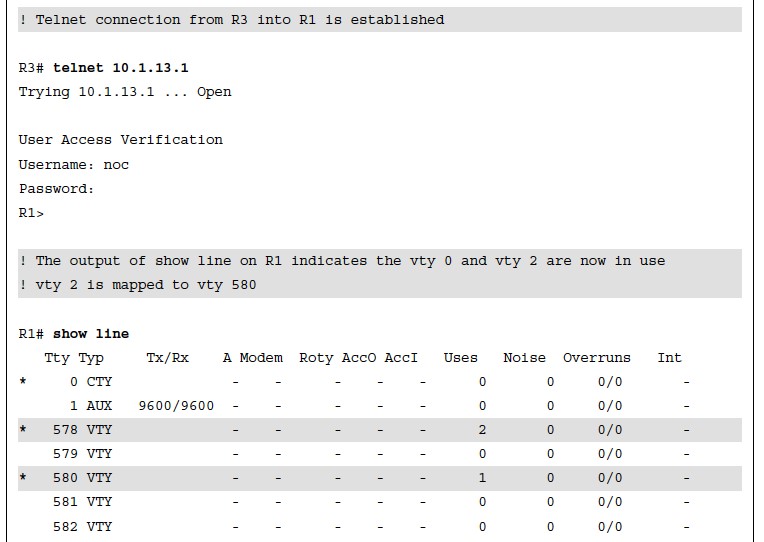
- Keep in mind that vty lines are evaluated from the top (vty 0) onward, and each vty line accepts only one user.
Verifying Access to vty Lines Using Transport Input
Verifying Access to vty Lines Using Transport Input
Enabling SSH vty Access
Telnet session packets are sent in plaintext, and this makes it very easy to sniff and capture session information. A more reliable and secure method for device administration is to use the Secure Shell (SSH) protocol. SSH, which provides secure encryption and strong authentication, is available in two versions:
- SSH Version 1 (SSHv1) – This is an improvement over using plaintext Telnet, but some fundamental flaws exist in its implementation, so it should be avoided in favor of SSHv2.
- SSH Version 2 (SSHv2) – This is a complete rework and stronger version of SSH that is not compatible with SSHv1. SSHv2 has many benefits and closes a security hole that is found in SSH version 1. SSH version 2 is certified under the National Institute of Standards and Technology (NIST) Federal Information Processing Standards (FIPS) 140-1 and 140-2 U.S. cryptographic standards and should be used where feasible.
Configuring vty Access Using SSH
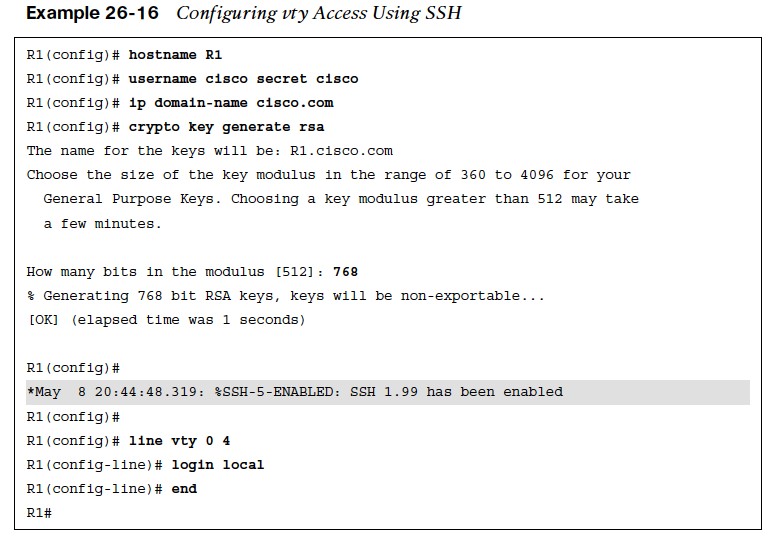
- Step 1. Configure a hostname other than Router by using the command hostname {hostname name}.
- Step 2. Configure a domain name by using the command ip domain-name {domain-name}. Step 3. Generate crypto keys by using the command crypto key generate rsa. When entering this command, you are prompted to enter a modulus length. The longer the modulus, the stronger the security. However, a longer modulus takes longer to generate. The modulus length needs to be at least 768 bits for SSHv2. To force the IOS SSH server to disable SSHv1 and accept only SSHv2 connections, enter the command ip ssh version 2 under global configuration mode.
Aux Port and Exec Timeout
- Some devices have an auxiliary (aux) port available for remote administration through a dialup modem connection. In most cases, the aux port should be disabled by using the command no exec under line aux 0.
- By default, an idle EXEC session is not terminated, which poses an enormous security risk.
- The command exec-timeout {minutes}{seconds} under line configuration mode can be used to disconnect idle user sessions. The default setting is 10 minutes.
- Example 26-17 shows a configuration in which the exec-timeout for the console line is configured to time out after 5 minutes of inactivity and 2 minutes and 30 seconds for the vty lines.

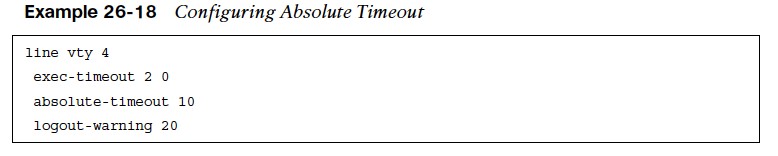
Absolute Timeout
- The command absolute-timeout {minutes} under line configuration mode terminates an EXEC session after the specified timeout period has expired, even if the connection is being used at the time of termination.
- It is recommended to use it in combination with the command logout-warning {seconds} under line configuration mode to display a “line termination” warning to users about an impending forced timeout.