NetFlow and Flexible NetFlow
examines the benefits and operations of NetFlow and Flexible NetFlow.
- Gathering statistical information on traffic flows is necessary for a number of reasons.
- is very versatile and provides a wealth of information without much configuration burden.
- has two components that must be configured: NetFlow Data Capture and NetFlow Data Export.
NetFlow Ingress/Egress Collected Traffic Types
NetFlow captures traffic on ingress and egress—that is, traffic that is coming into the devices as well as traffic that is leaving them. NetFlow collects traffic based on flows. A flow is a unidirectional traffic stream that contains a combination of the following key fields:
- Source IP address
- Destination IP address
- Source port number
- Destination port number
- Layer 3 protocol type
- Type of service (ToS)
- Input logical interface
Enable NetFlow
- R1’s Ethernet0/1 interface for NetFlow Data Capture and exporting the data to the 192.168.14.100 collector. Example 24-37 illustrates the process of configuring NetFlow Data Capture and NetFlow Data Export on R1.
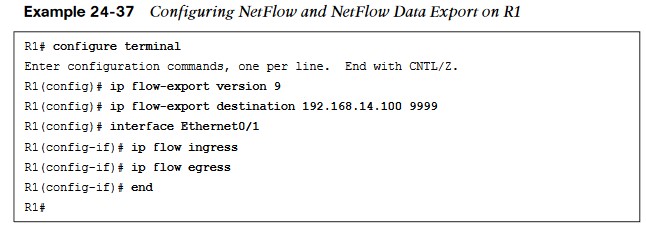
- To verify that NetFlow and NetFlow Data Export were configured properly, a few commands can be run. The first is show ip flow interface, which shows the interfaces that are configured for NetFlow. The second is show ip flow, which shows the destination for the NetFlow data to be exported to. Finally, show ip cache flow shows the traffic flows that NetFlow is capturing.
Configuring and Verifying the Top Talkers on R1
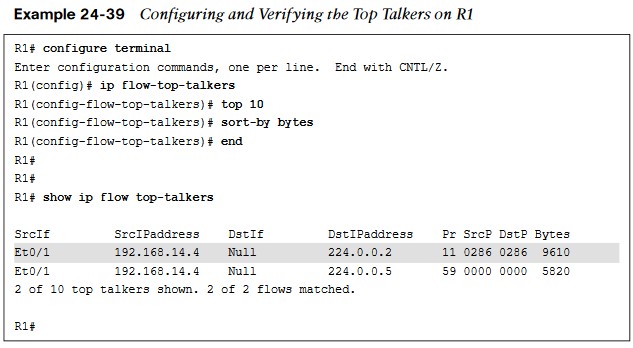
- NetFlow is able to configure the top specified number of talkers on the network.
- A very useful and quick configuration allows you to gain a great snapshot of what is going on in a device from a flow perspective.
- This view can be enabled by issuing the global configuration mode command ip flow-toptalkers and configuring the top command for the number of talkers (1–200) and the sort-by command to sort by bytes or packets, depending on the use case.
Flexible NetFlow
| Component Name | Description |
| Flow Records | Combination of key and non-key fields. There are predefined and user-defined records. |
| Flow Monitors | Applied to the interface to perform network traffic monitor |
| Flow Exporters | Exports NetFlow Version 9 data from the Flow Monitor cache to a remote host or NetFlow collector. |
| Flow Samplers | Samples partial NetFlow data rather than analyzing all NetFlow data. |
- Flexible NetFlow was created to aid in more complex traffic analysis configuration than is possible with traditional NetFlow.
- Flexible NetFlow allows for the use and reuse of configuration components.
- Flexible NetFlow allows for the use of multiple flow monitors on the same traffic at the same time. This means that multiple different flow policies can be applied to the same traffic as it flows through a device.
Sampled NetFlow Data Trade-offs
There are trade-offs in using sampled NetFlow data. The biggest one is that there is a reduced load on the device in terms of memory and CPU. However, by sampling NetFlow data only at specific intervals, something could be missed as the accuracy goes down with sampling compared to when gathering all data. Security has been a huge driver in the adoption of Flexible NetFlow due to its ability to track all parts of the IP header, as well as the packet and normalize it into flows.
- Flexible NetFlow can dynamically create individual caches for each type of flow.
- Flexible NetFlow can filter ingress traffic destined to a single destination.
You can use the collect and match commands to create a customized flow record. To create a custom flow record, certain key and non-key fields must be matched so the flow record is usable. The match command is used to select key fields, and the collect command is used to select non-key fields.
Flow Record Key and Non-Key Fields
| Field | Key or NonKey Field | Definition |
| IP ToS | Key | Value in the type of service (ToS) |
| IP ToS | Key | Value in the IP protocol field |
| IP source address | Key | IP source address |
| Transport source port | Key | IP destination address |
| Transport destination port | Key | Value of the transport layer source port field |
| Interface input | Key | Value of the transport layer destination port |
| Flow sampler ID | Key | ID number of the flow sampler (if flow sampling is enabled) |
Flow Record Key and Non-Key Fields (Cont.)
| Field | Key or Non-Key Field | Definition |
| IP source AS | Non-key | Source autonomous system |
| IP destination AS | Non-key | Destination autonomous system number |
| IP next-hop address | Non-key | IP address of the next hop |
| IP source mask | Non-key | Mask for the IP source address |
| IP destination mask | Non-key | Mask for the IP destination address |
| TCP flags | Non-key | Value in the TCP flag |
| Interface output | Non-key | Interface on which the traffic is transmitted |
| Counter bytes | Non-key | Number of bytes seen in the flow |
| Counter packets | Non-key | Number of packets seen in the flow |
| Time stamp system uptime first | Non-key | System uptime (time, in milliseconds) |
| Time stamp system uptime last | Non-key | System uptime (time, in milliseconds) |
Configuring Flow Records
Configuring flow records is an important step in enabling Flexible NetFlow. because the flow record defines what type of traffic will be analyzed or monitored.
- There are predefined flow records, and you can also create custom flow records.
- Custom flow records can have hundreds of different combinations to meet the exact needs of the business.
Configuring a custom flow record involves the following steps:
- Define the flow record name.
- Set a useful description of the flow record.
- Set match criteria for key fields.
- Define non-key fields to be collected.
Configuring the Custom Flow Record
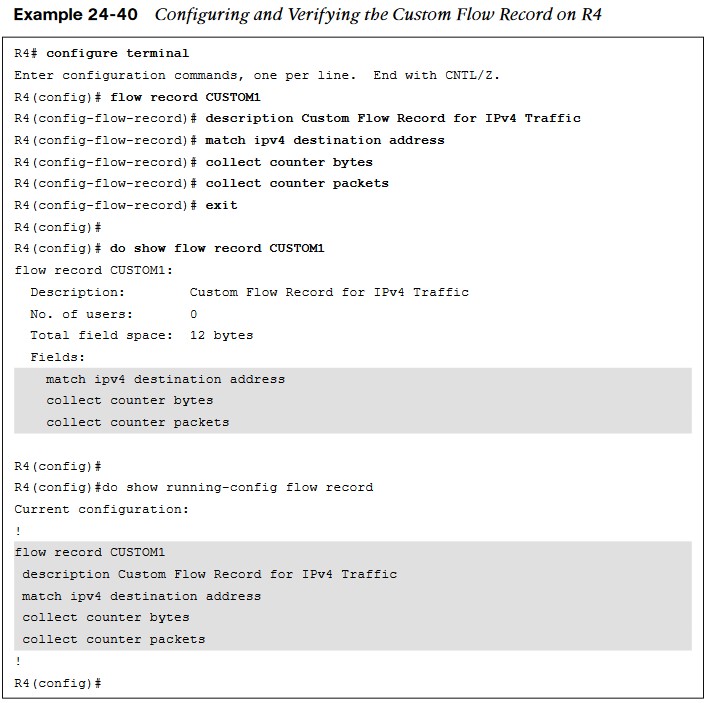
- Although many of the predefined flow records that are available may be suitable for many use cases, there are too many of them to cover here.
- Having the ability to build a custom flow record for a specific and unique use case makes it extremely powerful.
Configuring the Custom Flow Exporter
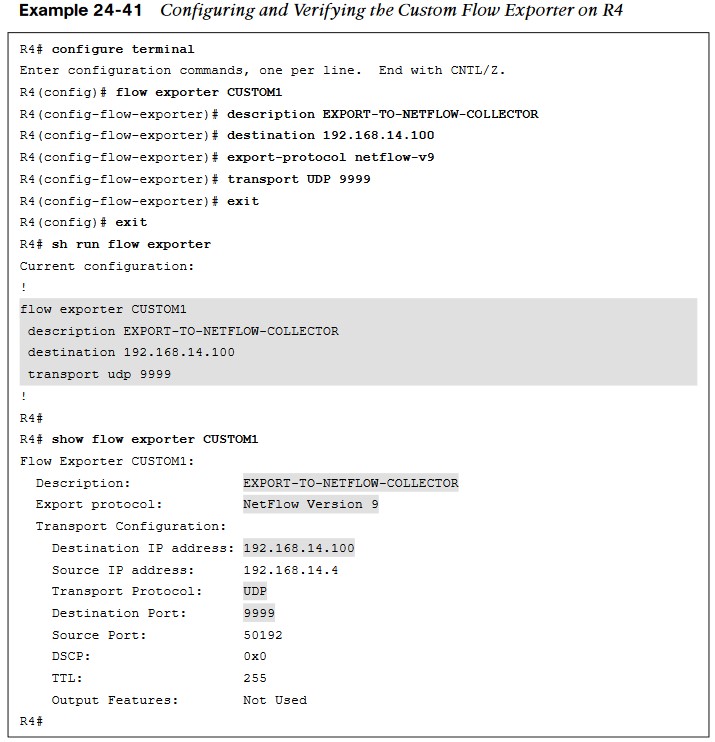
- Now that a custom flow record has been configured, the flow exporter can be created. There are a few important steps to complete when building a flow exporter:
- Define the flow exporter name.
- Set a useful description of the flow exporter.
- Specify the destination of the flow exporter to be used.
- Specify NetFlow version to export.
- Specify the UDP port.
Configure a Flow Monitor
Now that a custom flow exporter has been configured, the flow monitor must be created.
- Each flow monitor requires a flow record to be assigned to it.
- Each flow monitor has its own cache, and the flow record provides the layout and how to carve up the cache for the defined traffic defined in the flow record.
To configure a flow monitor, the following high-level steps must be taken:
- Define the flow monitor name.
- Set a useful description of the flow monitor.
- Specify the flow record to be used.
- Specify a cache timeout of 60 for active connections.
- Assign the exporter to the monitor.
The cache timeout tells the device to export the cache to the collector every 60 seconds. It is important when creating a flow monitor for the description of the flow monitor to be useful and to map back to the flow record.
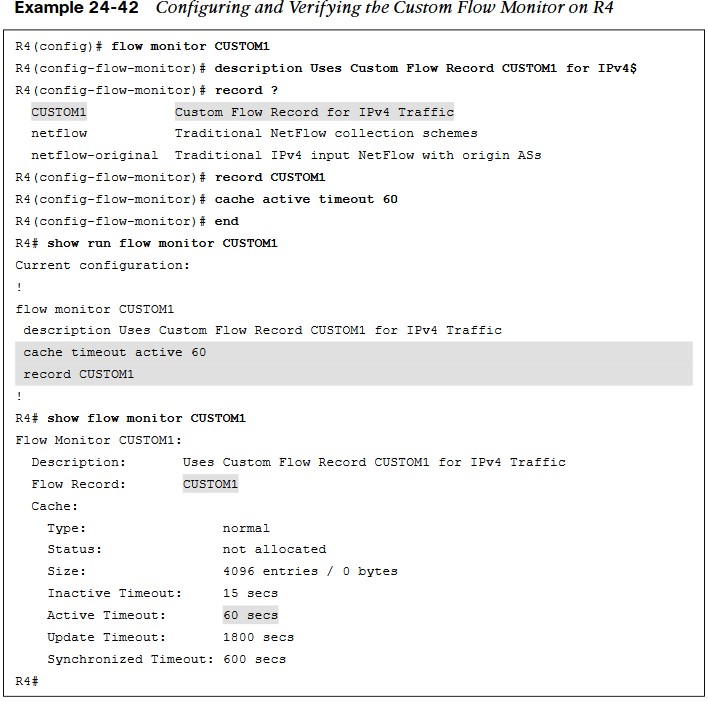
Configuring the Custom Flow Monitor
- When configuring QoS, it is nice to have the descriptions selfdocument the intent of what the policy is doing.
- This helps when configuring the flow monitor and when using context sensitive help, as the description that is configured shows in the output.
Configuring the Flow Exporter Mapping
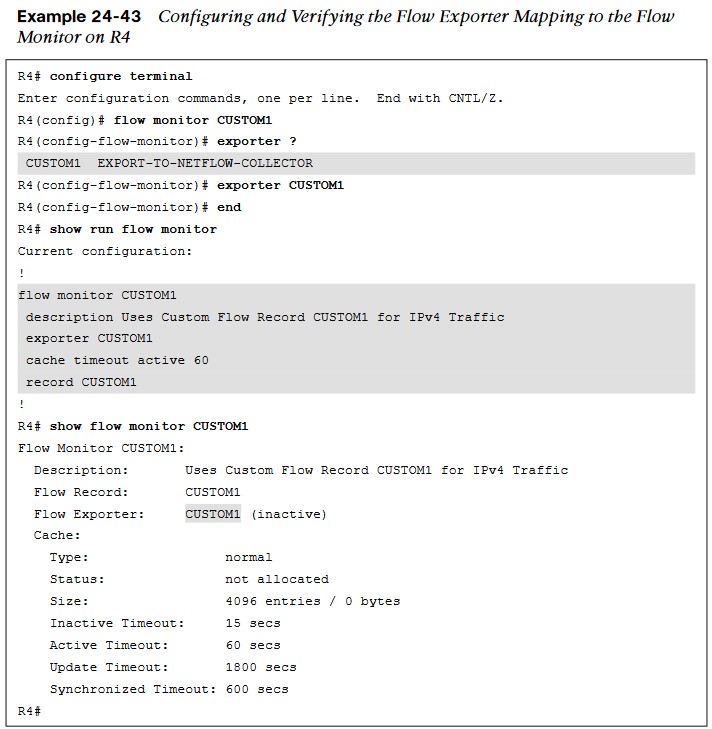
- The next step is to map the flow exporter CUSTOM1 to the flow monitor CUSTOM1.
- You need to essentially map the two together so the traffic that is being collected by the flow record can be exported to the NetFlow collector at 192.168.14.100.
- Example 24-43 shows the process and verification for adding the flow exporter CUSTOM1 to the flow monitor CUSTOM1 on R4.
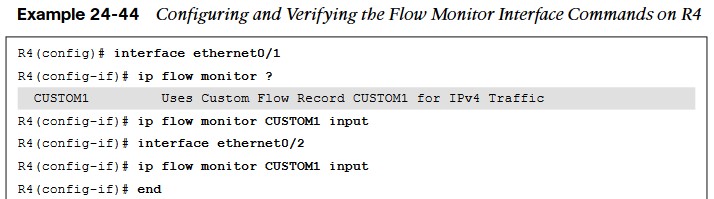
Configuring the Flow Monitor Interface
- The final step necessary in enabling Flexible NetFlow is to apply the flow monitor to the interfaces.
- This step turns on the collection of NetFlow statistics, and it can be enabled for ingress or egress or both.
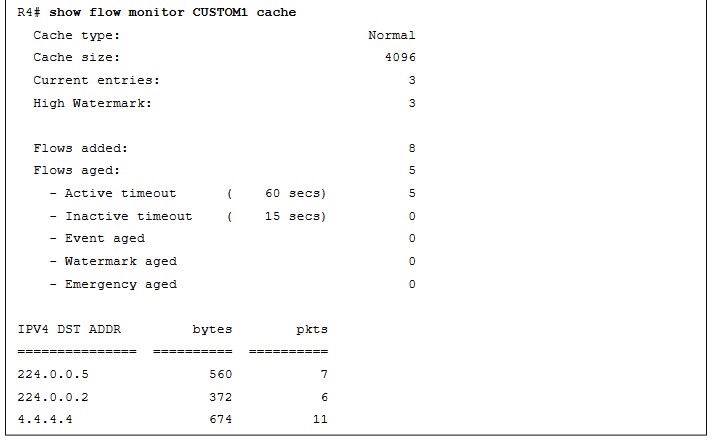
- how to verify that Flexible NetFlow is working by issuing the show ip flow monitor CUSTOM1 cache command.